

From time to time, I am sent teaching resources to review. I was offered a Magidome kit during the 2021 school year and was excited to see what learning this kit might offer our students. But, with all the complications of this school year, we simply did not have time to get to this anticipated project.
In June, our school hosts student teachers who are completing their B.Ed from the University of British Columbia. This year we had three community field experience (CFE) students with us, and this blog post reflects their experience as early career educators working with students to sort out the process of how to build a Magidome.
Post contributed by Hannah Gilgoff, Adelaida Airapetian and Eduardo Madrega.
How to Build a Magidome
During our community field experience, the three of us teacher candidates were looking to take on a project to contribute to the school community. We learned from, and collaborated with, the ADST teacher here at Homma Elementary, Dave Henderson. He introduced us to using power tools with students and provided us with the skills necessary to guide students through the process.
We chose to take on the challenge of building a Magidome with two grade 4/5 classes during our time with Megan Zeni and Sarah Regan. This turned out to be easier than expected and addressed several core competencies for learning. For example, before starting our project we encouraged students to look at the different parts and think about what the end product might look like.
As students did the actual building they collaborated and communicated with each other in a safe and responsible way. This was a very hands-on and experiential project for the students that resulted in a beautiful end product.
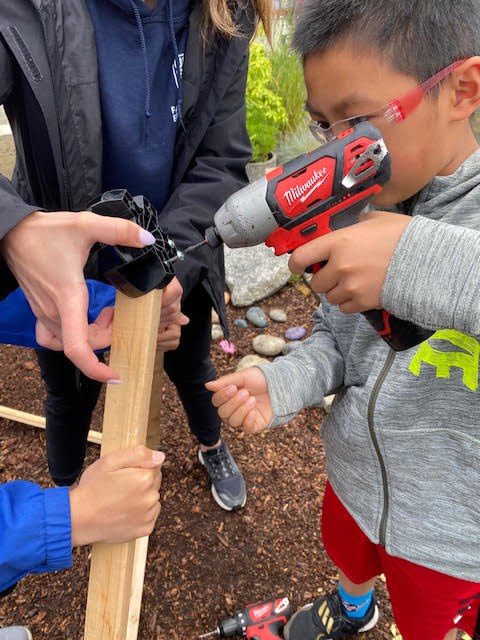
The students were eager to work with the drill and the screwdriver. In small, supervised, groups they were very responsible with the tools. (Note from Megan: read more about risky play with tools at school here.)
Introducing the Project to Students
We introduced the project to the class through an engaging read aloud of the book, “What We’ll Build” by Oliver Jeffers.
To build the MagiDome with an entire class, it worked well to divide students into groups and have the students rotate through geometry and ADST (Applied Design, Skills, and Technology) inspired stations.
Station Set Up
Because an entire class of students can not reasonably work on the building of the Magidome at the same time, integrated stations were used with the grade 4/ 5 students to rotate through:
- Chalk drawing with geometry and angles
- Origami
- Magidome building
- A book look of building & geometry texts
Curricular Connections
Big Ideas from the British Columbia ADST curriculum that are met with this task include:
- Use materials, tools, and technologies in a safe manner, and with an awareness of the safety of others, in both physical and digital environments.
- Demonstrate a willingness to learn new technologies as needed.
- Identify the main objective for the design and any constraints.
Materials Needed
Magidome are geodesic dome connectors that you can use to build a variety of projects. Full instructions on how to build a Magidome can be found at magidome.com.
- 11 Magidome connectors. In Canada they can be purchased here.
- safety glasses
- a drill
- a screwdriver
- 55 screws
- 25 lengths of wood cut to length for the size of Magidome you want to build (we used 4ft lengths for our project)
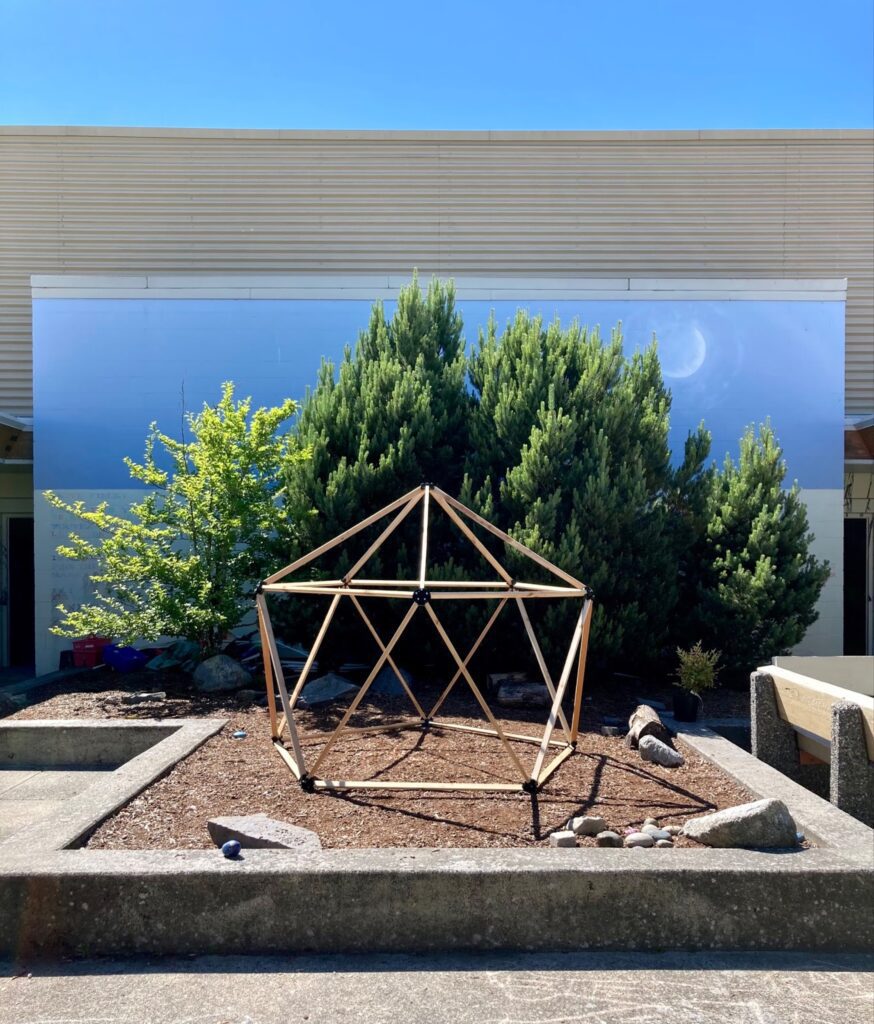
- a suitable space for building that can house a mostly permanent dome (ours is in a protected courtyard)
- students to lend their expertise and helping hands!
How we built our Magidome
- Order a Magidome kit that comes with 11 Magidome connectors
- Decide how big you want to make your dome. You will need 25 equal length timbers and 55 screws. We used timbers that were each 4 feet long to make the smallest recommended size that is 5.5 feet tall and 7.5 feet wide.
- Review ADST safety procedures with students, so that they are able to safely use the drill and driver.
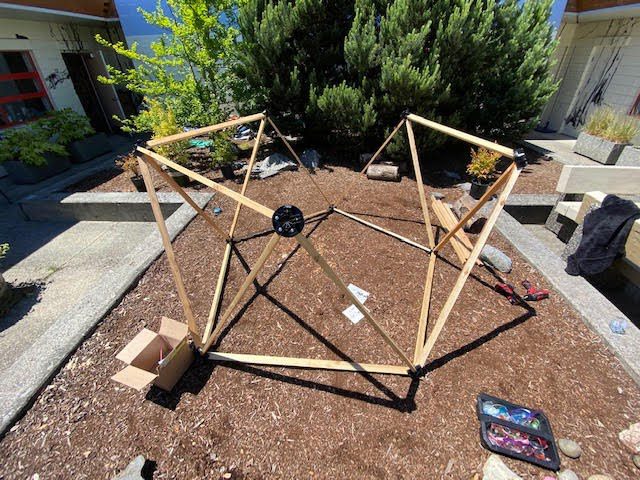
- Using the connectors and the timber, begin by making a pentagon shaped base.
- Once the pentagon base is set up, drill the holes through the connectors, and screw them together, one at a time. Make sure that your wood is flush with the plastic side of the connector.
*Tip: This will be easier done with at least two people holding the wood in place so that it does not slip around while drilling/driving.
6. Continue to build up the walls of the dome, using the geodesic triangle pattern.
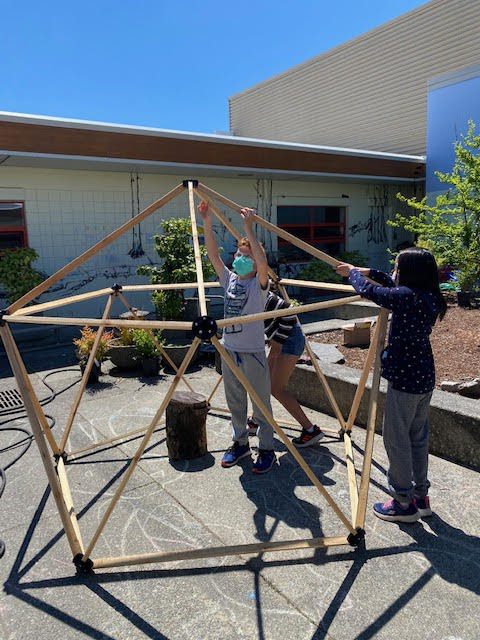
*Challenge: Ask your students to figure out how to add the roof.
7. Attach wood to opposite sides of the dome so that the roof becomes balanced and then you can work your way around, attaching the last pieces of wood to complete your dome!
How we plan to use our Magidome
- Maybe a greenhouse for seedlings, with a clear tarp added to the frame?
- A sensory dome with various fabrics as the cover?
- Let’s take it down and build it again!
- ADST drilling practice (reverse the screw and drive it in again)
- Applied skills for geometric thinking – measuring lengths, angles, volume
Recommended ages & limitations
Intermediate grades 4-7, with adult supervision and support. This is not a climbing structure. The Magidome we built would not support any weight from hanging, climbing, or swinging so must be built in a protected area and used under adult supervision.
Teachers with further questions that are interested in trying this project can connect with the developers here! https://magidome.com
Good luck with your project!